Add/Edit Users
- 03 Sep 2025
- 3 Minutes to read
- Print
- DarkLight
- PDF
Add/Edit Users
- Updated on 03 Sep 2025
- 3 Minutes to read
- Print
- DarkLight
- PDF
Article summary
Did you find this summary helpful?
Thank you for your feedback!
User Management
Single Sign-On (SSO)
If your college uses Single Sign-On (SSO) with the WS-Federation protocol, we recommend this as the preferred method for granting user access to WIDS. Note: Other protocols such as SAML, OAuth, and OpenID are not currently supported.
Active Directory
WIDS can be configured to integrate directly with your institution’s Active Directory.
Batch Upload
WIDS can perform a batch upload of users from an Excel file. The file should include the following information:
- First Name
- Last Name
- Title (optional)
- Department (optional)
- Username (usually the characters before the “@” symbol in the email address)
- Email Address
Adding Individual Users
You can add users individually at any time through your WIDS site.
You can use this screen to perform many roles for users.
- Edit user information and password. (If Active Directory is enabled, this will be read only.) To do so search for the user and click Edit next to the user’s name.
- Assign system roles using the droplist in the System Role column. This is a quick way to change a user’s system role. (You can also access the system role by clicking Edit next to user’s name.)
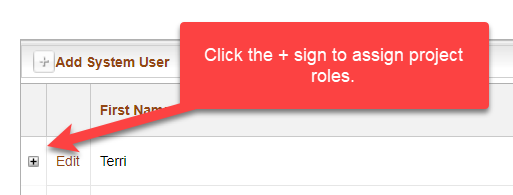
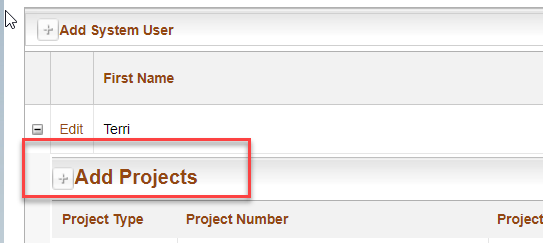
- Expand the + sign to view user’s project roles. Select Add Projects to add, edit or remove project roles. (You must be in Edit to add roles.) This will add the user to the project and place the project on his/her home page.
- Archive a user. When you archive a user you remove the user’s access to WIDS. However, all data connected to the user remains unchanged. Archived users can be reactivated by selecting the Show Archived button on the top left of the grid and searching for the user. Once reactivated, the user will have access to WIDS using the same credentials as before the archive. All roles in effect prior to the archive will be reactivated. This is an excellent option for adjunct faculty who may have access to WIDS one semester—but not the next.
- Remove all roles. To remove all project roles from a user, click Remove All Roles.
- Delete a User. When you delete a user, all of their projects and history remain. However, user is no longer in your WIDS system.
New Site User Import
WIDS can import a group of users for a new WIDS site.
Add a New User
Adding New Users
If your organization uses SSO or Active Directory, new users are typically managed through that process.
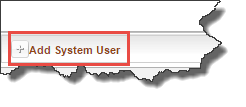
With the screen in edit click Add System User.
WIDS opens a dialogue box. Enter the information requested. You must include the First Name, Last Name, Username, and Email Address. The username is what the user will use to login to the WIDS site.
Select a System Role from the droplist. Most users have the system user role.
Tip: WIDS immediately sends an email to the user with the username and password. If the user does not receive the information, check the Junk folder.
Manage User Passwords
Tip: If your WIDS site is connected to your SSO or Active Directory—you cannot manage passwords in WIDS.
Users can change their own passwords by using the Forgot Your Password link on the login screen. (The link is not available for organizations connected to Active Directory or SSO).
- With the screen in edit, search for the user using the search fields provided. WIDS returns a list of users that match your search.
- Click Edit next to the user’s name.
- WIDS opens a dialogue box. The password field will be blank. Enter a password into the Password and Confirm Password fields.
- Click save.
Tip: The user will not receive an automated email if you manually change the password.
Add Project Roles to Users
Project Roles
Project roles can be added individually from the program or course. This screen allows you to add roles for multiple projects at once.
Place the screen into edit. Search for a user to assign projects.
Click the + sign to the left of the user’s name.
Select Add Projects. WIDS opens the Select Projects and Roles dialogue box.
Select Course or Program from the dropdown and enter a project title or number in the text box. Click Search. WIDS presents a project list.
Check projects you want to assign. More than one project may be selected.
Select the role from the dropdown. Click Assign Role. WIDS adds the projects to the preview pane below.
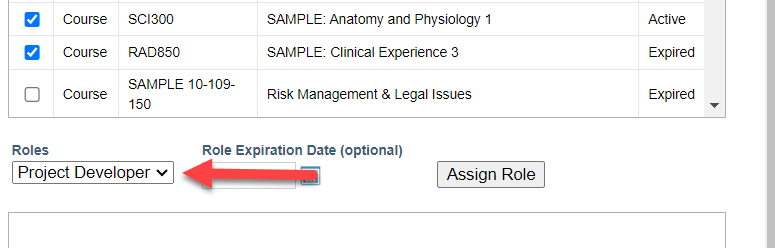
If desired, search again or select Save to complete the assignments.